How to connect Paddle to Tutor LMS
This tutorial gives you an introduction to how you can integrate Paddle with TutorLMS using the WP Webhooks Automator plugin.
Requirements
To make the automation work, here’s what you need:
- Paddle: https://www.paddle.com/
- Tutor LMS: https://wordpress.org/plugins/tutor/
- WP Webhooks Automator: https://wp-webhooks.com/
Prepare the setup
As seen in the video, we are working with multiple tabs to provide faster access between the different platforms. Please open the following tabs for your convenience:
- Please make sure you open the Webhooks tab of Paddle and head to the “Webhooks simulator” section.
- Log in to your WordPress website and head to the Tutor LMS menu item (Or activate the plugin if you haven’t yet)
- If you do not have an online course within Tutor LMS, please create one depending on your needs.
- Head over to WP Webhooks Automator and activate the license key
- Install the following integrations within the “Integrations” tab of WP Webhooks: “Webhooks”, “WordPress”, “WP Webhooks Formatter”, and “Tutor LMS” (Search for that one within the search field).
Get started
Create a workflow automation within WP Webhooks Automator. You can do that within your WordPress dashboard > WP Webhooks Pro > Automations. (Set a useful name of your choice. E.g.: Paddle to Tutor LMS)
Add the trigger along with the “Webhooks” integration and the “HTTP request received” trigger. Once done, you will get access to a dynamically created URL:

This URL accepts data from other webhook or API endpoints. In our case, we are going to add it within the webhook test environment of Paddle for the “Payment success” endpoint.
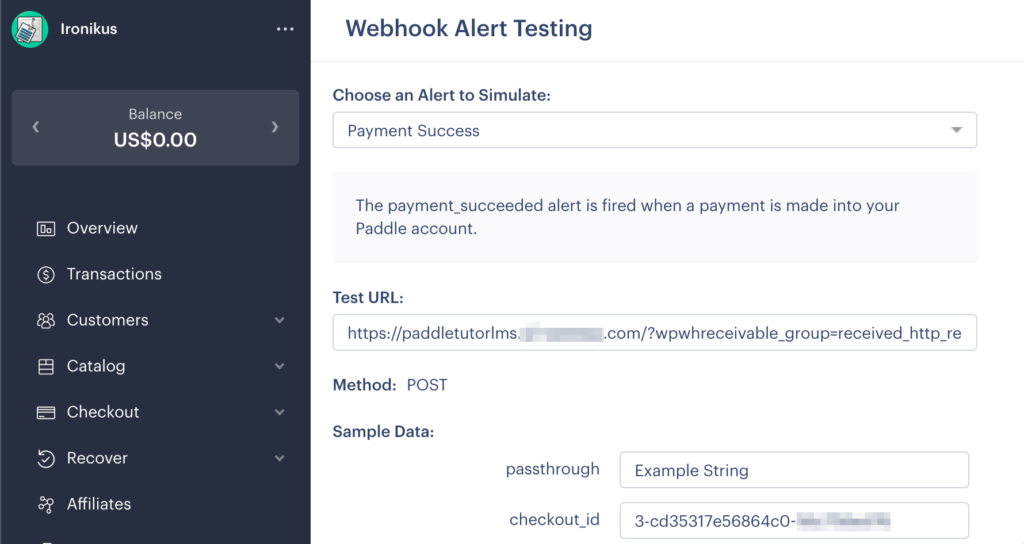
After you’ve added the URL, please scroll to the end of the page and click the “Call webhook” button. This will cause the Paddle webhook to fire the test data to WP Webhooks.
After you head back into the Automation workflow of WP Webhooks, you can now continue the action and select the “Get log data” item from the dropdown. This will display one log item which was created due to the request sent from Paddle to our plugin. Once selected, you can finish the trigger.
Congratulations, you have now successfully managed to send data from Paddle to WP Webhooks Automator.
Create the user
In the next step, we are looking at creating the WordPress user (or update it in case it already exists). To do that, please click on the “Add action” button within the workflow automation and select the “WordPress” integration along with the “Update user” action. We are using the “Update user” action as it allows us to create the user in case it does not exist while updating it if it does.
The two first fields you see are user_id and user_email. In our case we do not have the user ID (as of now) so we use the user_email instead.
From there, you can set up the fields of your choice and the data you’ve received from within the Paddle webhook.
To access the data, you can simply click into one of the text fields, which shows a dropdown along with every single step of the flow until the current step. After you click the dropdown, you will see the accessible response data from Paddle. Based on your need, you can select any of those dynamic tags to re-use the data within the action.

After you’ve added all of your details, please make sure to set the “create_if_none” argument to “Yes” as this allows the action to create the user in case the given email does not exist.
The last step for the update_user action is to test if it works as expected. To do that, please click continue on the “Action settings” until you reach the “Test action” step.
Within it, please select “Fire webhook action” from the dropdown and click the button afterward. This will send an actual request to your website, creating a user with the data we have set up in the previous steps. From then on, you will see the newly created (or updated) user within your WordPress website, along with the response data (including the user ID).
Please finish the action by clicking on “Finish action”.
Enroll the user in a Tutor LMS course
The last thing that’s missing is to enroll the new user into a Tutor LMS course of your choice.
To do that, please add a new action along with the “Tutor LMS” integration and the “Enroll user” action.
Once done, click through to the “Action settings” where you will find the possibility to add a user ID or email along with the course ID you want to assign the user to.
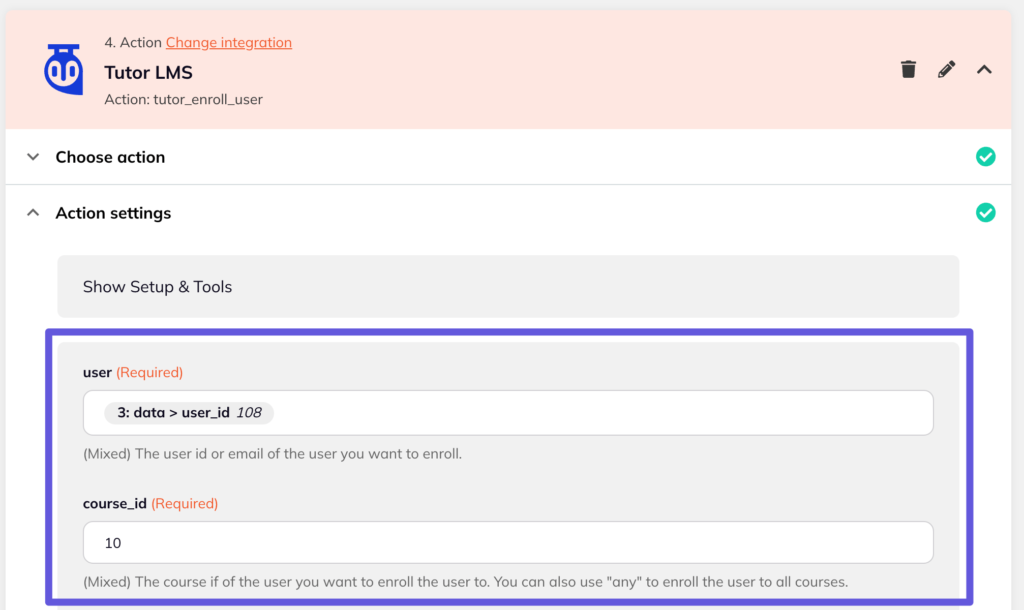
The user can contain a user ID or email of an existing WordPress user. In our case, we dynamically selected it from the previous step where we created the user.
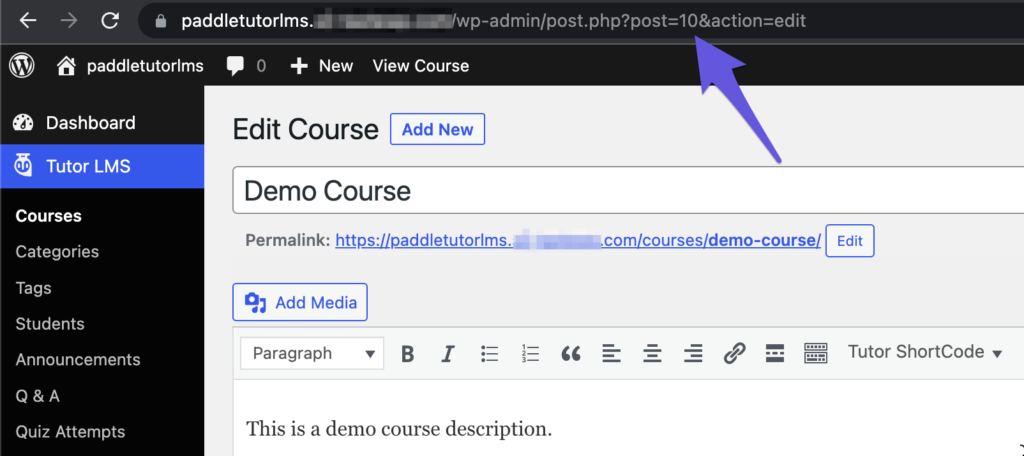
The course ID is set to 10, which references to the course ID of the course inside of Tutor LMS. To get the course ID, you can head to the course of your choice. Once you open it, you will find the course ID within the URL:
After you’ve set up the action accordingly with its values, continue to the “Test action” step and fire the webhook action. This will enroll the previously created user (from the “Update user” step) to the selected Tutor LMS course.
Then finish the action and activate the workflow (In the sidebar).
That’s it. You’ve successfully created a connection between Paddle and Tutor LMS.
Additional details
Within the video, we have further explained how you can separate the name string to add the first name and last name as separate values, as well as how you can add custom user data to the Tutor LMS fields such as “Job Title” and Profile Bio”.
This manual explains the setup using the “Webhooks simulator” of Paddle. To connect the workflow to the actual and real webhooks, please add your webhooks to the Webhooks tab of Paddle.
If you are looking to use more webhook event types (Within Paddle) with the same receivable URL (From the trigger step), you can set up conditional within the trigger. This is explained at the end of the video.
Sign up for WP Webhooks news
Get the latest features, tutorials and promotions directly into your inbox.