How to create a post for a custom post type
It is known that WP Webhooks can help you to create posts along with metadata and custom taxonomy relations, but how can you use the plugin to do exactly that, but for a custom post type?
In this article, you will learn how to create a post for a custom post type of your choice, as well as how you can add further information like metadata to it.
What is a custom post type?
You probably know WordPress “Posts” as the articles you can create on your website that are then displayed as separate articles. But did you know that most other features like Pages and Media attachments are posts as well, just of a different type?
WordPress itself manages those kinds of posts within the same structure, differentiating them only by a field called post_type. This enables WordPress and other plugins to use the default structure of WordPress for creating own custom post types with all of the amazing features WordPress offers by default. To give you an example, here are a few custom post types and their slugs as WordPress uses them:
- WordPress posts
Post type: posts
Usage: Acts as the default posts you see as articles on your website. - WordPress pages
Post type: page
Usage: This is the default pages type that allows you to add pages to your website. - Media attachments
Post type: attachment
Usage: These are posts that are created to regsiter your uploaded images and files. Every image and file you upload within your media will receive an own post with the post ype attachment. - Woocommerce orders
Post type: shop_order
Usage: This post type is used by Woocommerce to manage their orders. - Woocommerce products
Post type: product
Usage: This is a custom post type that manages products that are created by Woocommerce.
Use WP Webhooks to create/update a post for a custom post type
Using WP Webhooks, it is fairly simple to make that work as we support most any default feature offered by WordPress.
While the basic setup is just as for every other webhok action, you can refer to it via the single action page. Down below is a short manual on how to do that:
Create a post for a custom post type
- Set up the create_post webhook action. You will find a dedicated manual on that here: https://wp-webhooks.com/integrations/wordpress/actions/create_post/
- Once you set it up, your webhook action should be already functional. At this point, we can now make sure to pinpoint the post to your chosen post type. To do that, we first must find the slug for your custom post type. In most cases, this can be done by visiting the page on which you can see all of the posts for it. In our example, you will see it for the Order post type of Woocommerce:
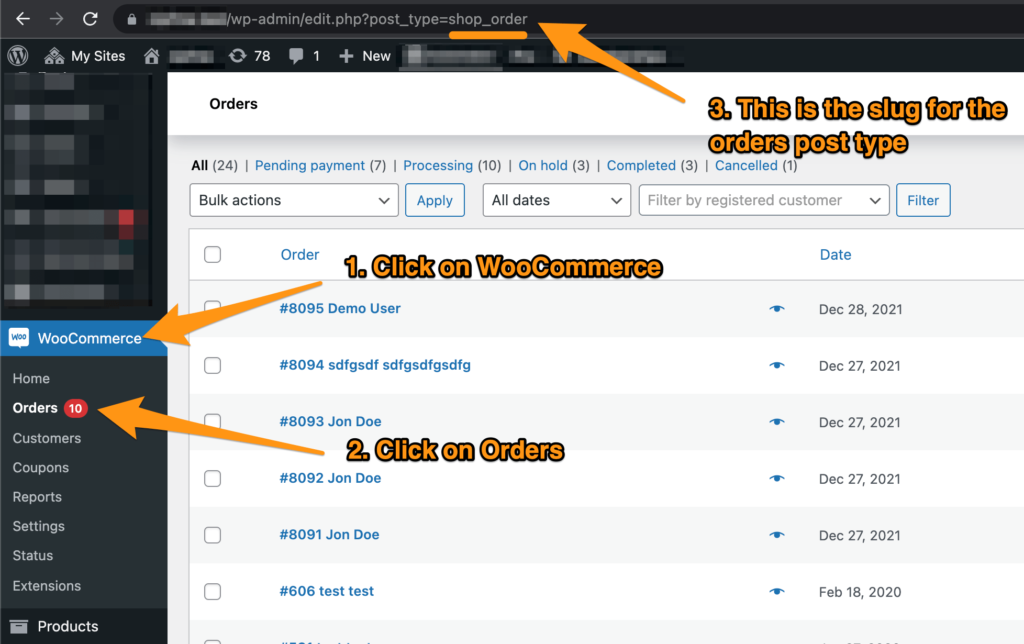
The location of a custom post type slug - Once you located the custom slug, simply copy it.
- Lastly, you need to add it to your action request to tell our endpoint that it is a custmo post. To make that work, please define the post_type argument within your request and set as the value your copied post type slug.
- After that, your post will be created for your chosen post type.
- That’s it! Now your post will be assigned to the custom post type of your choice.
Update a post for a custom post type
- Set up the update_post webhook action. You will find a dedicated manual on that here: https://wp-webhooks.com/integrations/wordpress/actions/update_post/
- Once you set it up, accordingly, you only need so specify the post id of the post you want to update – we then automatically detect the custom post type for you and update everything based on your request.
- That’s it, you now successfully set up the post update feature for your custom post.
Add/Update meta data for your post
To learn more about how to create and update custom meta data and Advanced Custom Fields data within WP Webhooks, please visit the following manual.
Sign up for WP Webhooks news
Get the latest features, tutorials and promotions directly into your inbox.