Via our Flow feature, you can create fully dynamic automation workflows, directly on your WordPress website, just like via any other automation service.
Enjoy using Flows in combination with any other feature we offer.
Down below, you will get an introduction on what the flow feature is about and how you can benefit from it. If you first want to understand what Flows actually are, please see this article.
Explained
Our Flows feature is located within our plugin page inside of your WordPress dashboard -> Settings -> WP Webhooks -> Flows
Once there, you will be able to create as many Flow templates as you like.
To do that, simply click on the Create Flow button and add a template name of your choice (We always recommend naming it based on your purpose).
After creating it, you can start accessing/editing the flow via the gear wheel  next to it. Once clicked, you will see the edit screen of your Flow:
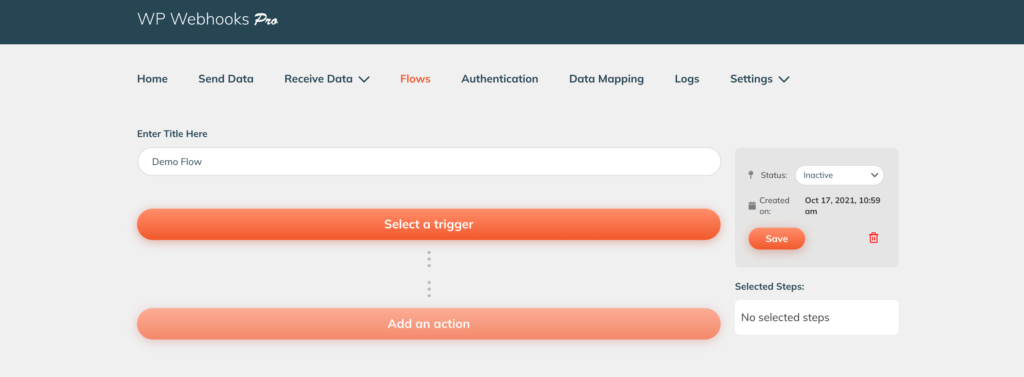
The trigger
The first thing you want to take a look at is the “Select a trigger” button, which is responsible for executing your Flow.
Generally speaking, a trigger is a specific event of your choice that, once happened, can execute further logic/steps to do actions automatically on your behalf.
E.g. A user registers on your site (trigger), so send this information to the admin (action)
To setup your trigger, simply press the “Select a trigger” button and choose the integration you would like to use.
Once done, it should look something like this:

From the “Select a trigger” dropdown, you can now choose a specific event that is responsible for executing this Flow once it happens. In our example above, we choose the “Form submitted” trigger, which will fire once an Elementor Pro form has been submitted.
After you selected your trigger, click the “Continue” button – this will display a list of possible settings and customizations directly within the trigger itself.

By default, you do not need to configure anything as the webhook works out of the box.
Nevertheless we recommend to use the customizations to avoid unnecessary performance use and possible errors by adjusting the settings for your needs.
In our example, we can select also specific forms to fire the trigger on. If no specific form is selected, all of them will trigger the flow.
It is also possible to use our other features with the trigger, such as the Data Mapping, as well as the Authentication.
Done with your settings? Simply click the button “Continue & save fields” – this will bring you to the testing step for the trigger.
Testing the trigger is important to get the demo data ready for the next steps. Therefore, we offer you two possibilities
- Log data
This allows you to select already existing logs for this trigger to be selected as your real data within the plugin. - Static data
This is a predefined request within our plugin, featuring certain default fields to get you started the fastest way. (Downside: You might miss out on custom values that are sent over specifically with your site)
That’s it! After clicking “Finish trigger”, you are ready to set up your actions.
The actions
Once your trigger is set up, the flow is (basically) ready to work with real data.
Nevertheless, with only the trigger set up, nothing happens as the trigger can’t do much by itself within the Flow.
That’s where the actions come in handy – they allow you to execute further events to take more manual work off your hands and to save you time and resources.
While you can add as many actions as you want, down below is an example of how to configure them correctly:
Just as with the trigger, the first step is to select an integration from the dropdown that you’d like to use for your first action, as well as the first action of that specific integration.
Once set up, you will find a list of fields (the so-called arguments) that you can use to customize data which is used for your selected action:
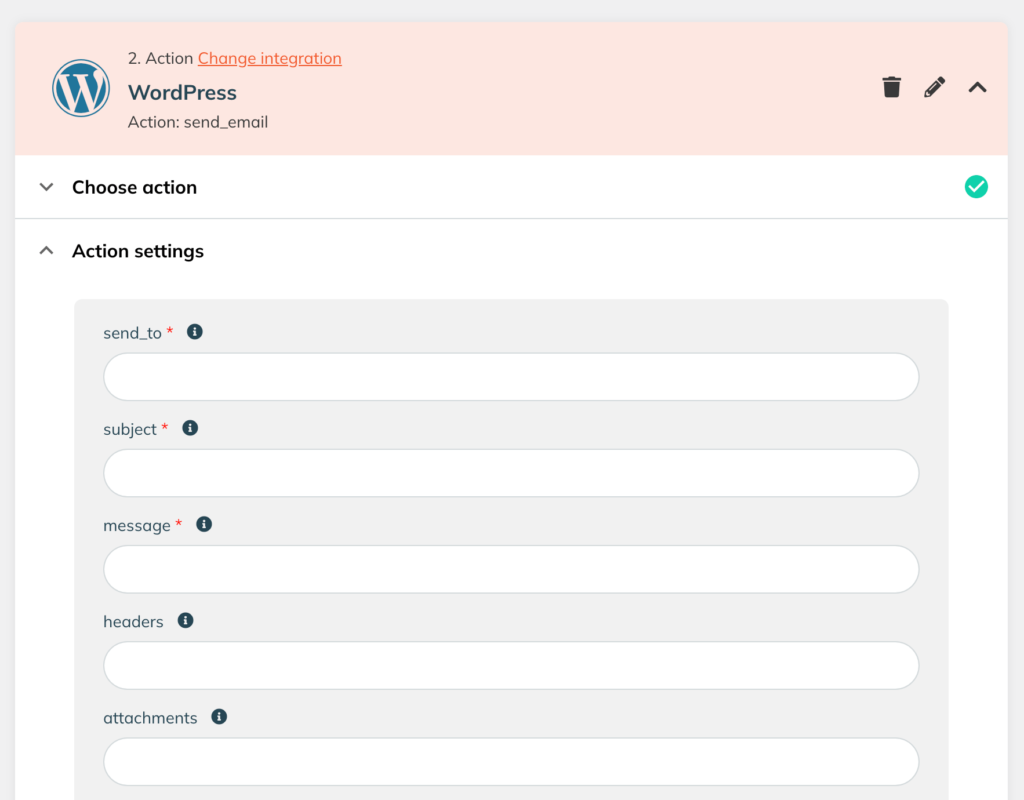
As seen in the screenshot above, the action settings allow you to set up certain kind of values that are used when executing this specific action.
In our example, we are using the “Send Email” action which will send a custom email from your WordPress website once it was executed.
As seen, this argument has three required fields which are explained down below:
- send_to
This field accepts one or multiple emails to send the email to. - subject
The subject of the email that is going to be sent. - message
The actual message content of the email.
Once you set all of those arguments, you are ready to test it. To do that, simply click the “Continue & save fields” button, which will bring you to the test page
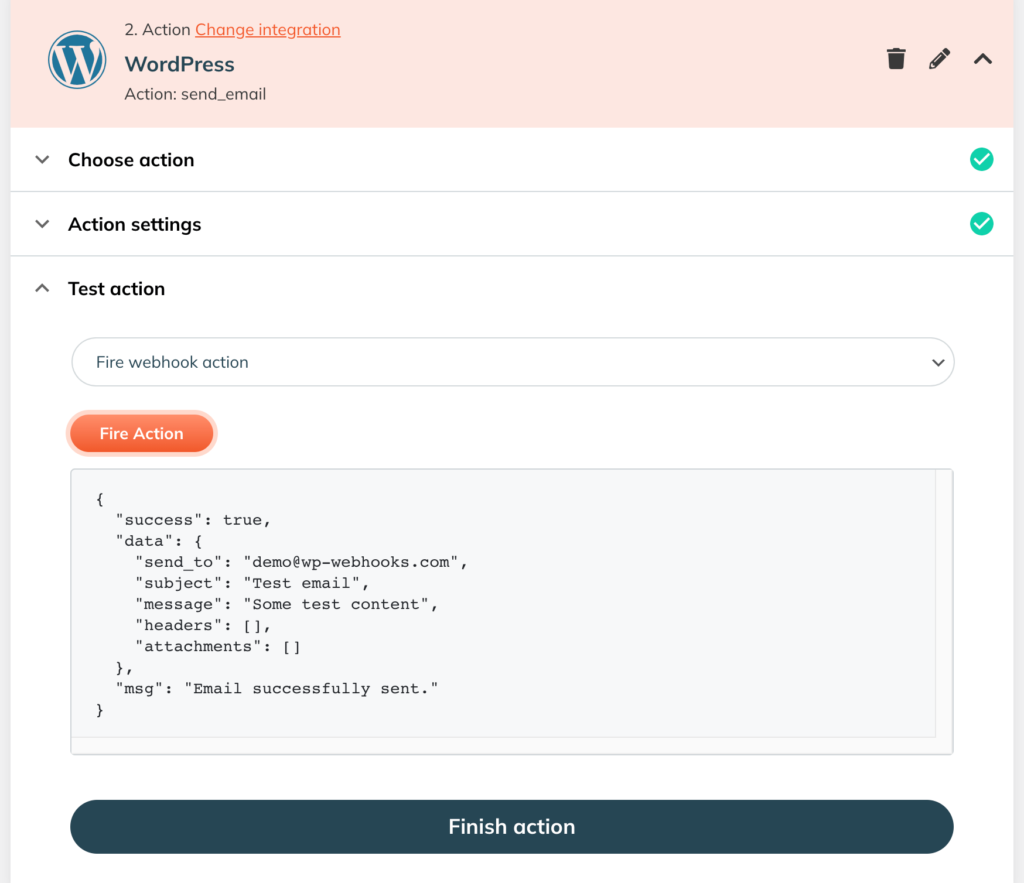
As seen in the screenshot above, we have a successful test using the live “Fire webhook action”.
While the test feature is similar to the trigger, here’s your available options:
- Log data
This allows you to select already existing logs for this action to be selected as your real data within the plugin. - Static data
This is a predefined request within our plugin, featuring certain default fields to get you started the fastest way. (Downside: You might miss out on custom values that are sent over specifically with your site) - Fire webhook action
Send a live request from your flow, testing this specific action with live data.
PLEASE NOTE: This feature works with live data and changes of your website.
Conditions
Since version 4.3.4 of WP Webhooks Pro, it is possible to add conditions to each of your action steps. This allows you to filter the action against certain values before executing it.
Note: If a condition is not met based on your setup criteria, the action step is skipped and the Flow will continue with the next one.

To use conditionals on an action, simply open the conditionals tab on your action step and select from the dropdown the condition relation. This relation tells the condition checks on how to validate them as one. Here are the dropdown values explained:
- ALL (default)
If the condition relation is set to ALL, every of your added contions within this action step has to be true, otherwise the action will be skipped. - ANY
Once you select ANY, the action will be executed if one (or multiple) of the conditions meet the criteria
To add a condition check itself, click on the “+ Add” button and set up your conditions.
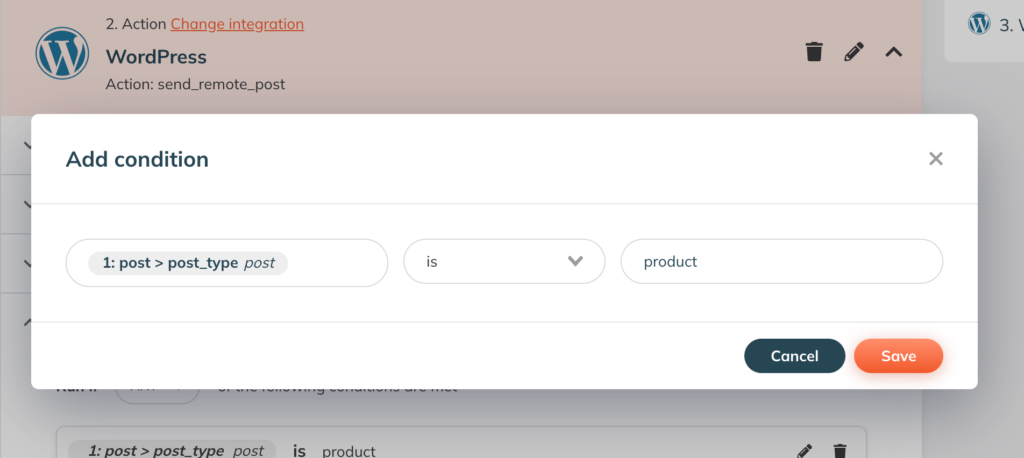
As seen in the screenshot above, you have three fields to set up for each condition.
The first field is the condition input (which acts as the input value that we check for), followed by the condition operator (the matching criteria) and the condition value (The value we check against).
To give you an example based on the screenshot above: If the post type (that was given within the Flow trigger) equals the type product, the condition is true, otherwise, it is false.
The condition operator comes along with various settings, which are explained down below:
- is
The condition input has to be equal to the condition value - is not
The condition input has to be not equal to the condition value - contains
The condition input has to contain the condition value (It does not meet to match it exaclt, but it is enough if it is within the given string) - does not contain
The condition input is not allowed to contain the condition value - is greater than
The condition input must be greater than the condition value - is greater than or equal to
The condition input has be greater than or equal to the condition value - is greater than
The condition input must be greater than the condition value - is less than
The condition input must be less than the condition value - is greater than or equal to
The condition input must be less than or equal to the condition value
Once you set up all of your conditions, click Set conditionals and you are ready to continue with your setup.
Take it live!
Once you set up all of your actions, you are ready to take your flow live. To do that, simply change the status to “Active” and your flow is set up to work with real life data, allowing you to use your time and resources elsewhere. 🙂
Dynamic variable mapping
Our Flows come with a very powerful feature that allows you to use the actual data from your previous steps inside the fields and settings of the next ones.
This way, you can use directly every available data for the automation of your next steps.
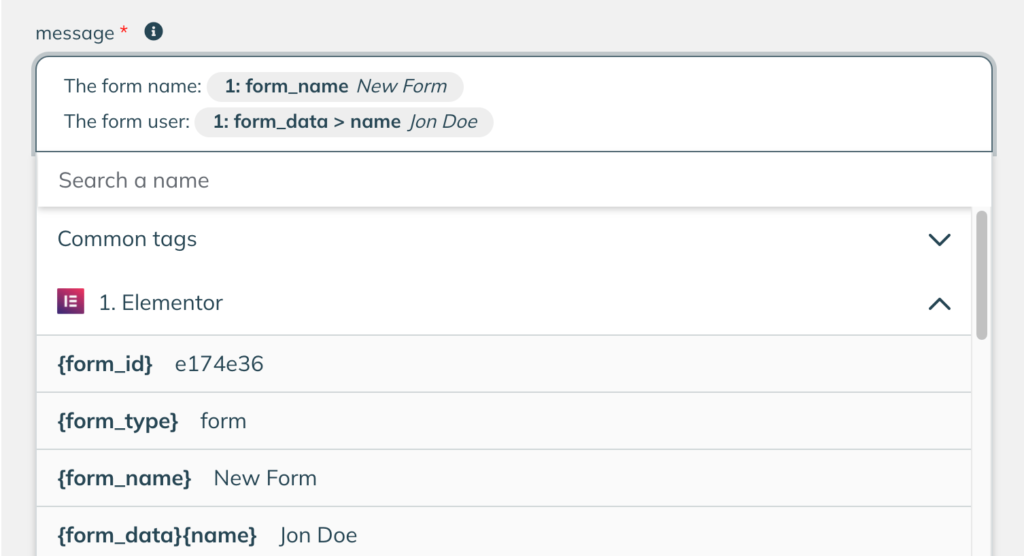
To give you an example of the availability of the variables, here’s how this would look in “steps”:
- A trigger is fired.
This trigger contains certain information about the event that happened. Let’s assume it was sent by a contact form, so the provided information might be a user email, the subject and message of the form. - Add it to your action
Now our flow feature will prepare this data to make it available within the next actions you add. This means that within a huge set of values you set up for an action, you can include those specific return fields from the trigger, re-using the data for the action. This works as a single data entry, as well as inline in between of a static value. - Re-use actions
The same functionality works for actions. This means you can use the response data from the previous actions in the following actions, making it very easy to create various custom data setups.
Common tags
Next to our step-based tags, we also offer common tags that are always available by default. Those tags include the admin email, site title, user id, current date, and more.